Building the main work surface
|
Sign
Guestbook
View
Guestbook |
    |
|
| Your first construction project is to build the work surface itself.
There are a few construction techniques that you will need to pull this off. |
| Construction Technique #1 - attaching pine 2x piece to particle board. |
 |
Diagram #1
The particle board is framed by 2x4s and 2x6s. The framing pieces are attached to the
particle board using short sheet-rock screws. To do this lay the particle board flat on
the floor with the least stained side up. Slide the pine piece under the edge of particle
board to which it will be attached. Use a C-clamp to attach hold one end of the 2x to the
particle board such that the edge of the 2x exactly lines up with the edge of the particle
board. Use another C-clamp on the other end of the 2x. Use more C-clamps if needed to
remove a warp from the 2x. Place a screw on the particle board (point down) about
1/2" from the edge. Use the variable speed drill with screwdriver bit into the screw.
Apply pressure. The technique for driving the screws involves driving the screw quickly
but allowing the drill to slip out as the head of the screw hits the particle board. The
screws will self-counter-sink but if too much power is put into the screw after it is all
the way in, the screw will break. If a screw breaks (and they will until you get good at
it), simply reverse the head back out and go on to the next screw location. Even a broken
screw will hold the wood pieces together.
|
|
| All of the shelves are constructed by attaching an 8' piece of pine to
the front and back edges of a piece of particle board. Then a cut piece of pine is placed
in between the front and back edges to make the sides. Finally a 2" x2x4 block is
placed in the corner and screwed in from the outside of the shelf using long sheet-rock
screws. |
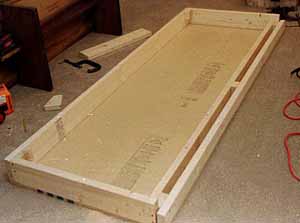
Parts for main work surface
 | an 8' x2x6 piece for the back edge |
| an 8' x2x4 for the front edge, |
| two 2' 9" (cut to fit) 2x6 side pieces, |
| four 2" x 2x4 chocks |
| a 7' 9" front edge reinforcement 2x4" piece (cut to fit), |
| and a 6" x 2x4 brace between the reinforcement piece and the front edge. See
Diagram #4 |
|
 |
Diagram #2
Attach a 2x6 by 8' to what will become the back edge of the main work surface. Use the
technique described above. Next, attach a 2x4 by 8' to what will become the front edge.
Now take a 2x6 and cut it to fit on one side of the work surface in between the front edge
and back. Cut the side piece shorter than exact fit by a 1/4" if needed. Don't get
carried away with accuracy or you'll be crying later when pieces warp. Pine does that.
|
|
 |
Diagram #3
Use a C-clamp to hold the corner block to the frame pieces. Orient the chock so that the
wide side is towards the back. See the diagram on the left. Use a starter bit (about
3/32") and about 1+1/2" long, to drill starter holes, then follow with the
longer screws. Put two screws through the side frame piece and two into the back frame
piece. Try to keep the screws from splitting the chock. If you get a split, remove the
chock and start over.
|
|
 |
Diagram #4
The chocks should be attached to the back and front boards in the frame. You should never
be putting a screw into the grain end of a 2x4 piece, including the chocks. Place the
chocks accordingly.
After doing the side chocks, put in an extra chock near the middle of the front frame
piece. This will be used to hold the re-enforcement piece. |
|
 |
Diagram #5
The reinforcement piece should be attached to the particle board in at least three places
through the top of the work surface with short sheet-rock screws. About 3 " from each
side, and once in the middle. Use a few scrap pieces of 2x4 to model the distance from the
front edge of the bench to show where to put the screws.
|
|
 |
|
|
