Building the bench side A-frame parts
|
Sign
Guestbook
View
Guestbook |
    |
|
|
 Now that you have the main work
surface completed you can use that as a platform on which to lay out the side pieces. Get
a pair of 2x6 pieces and cut them down to 6" shorter than the ceiling height of the
shortest room the bench is likely to end up in. Generally 7' or so is good. Lay a cut
2x6x8' piece along the front edge of the work-surface such that it is flat on the top of
the work-surface and perfectly lined up with the front edge and with one end (call it the
bottom of the 2x6) aligned with a side of the work surface. Clamp to the under-side of the
front edge of the work surface, at the bottom of the 2x6, and 1' or more from the other
end. Now that you have the main work
surface completed you can use that as a platform on which to lay out the side pieces. Get
a pair of 2x6 pieces and cut them down to 6" shorter than the ceiling height of the
shortest room the bench is likely to end up in. Generally 7' or so is good. Lay a cut
2x6x8' piece along the front edge of the work-surface such that it is flat on the top of
the work-surface and perfectly lined up with the front edge and with one end (call it the
bottom of the 2x6) aligned with a side of the work surface. Clamp to the under-side of the
front edge of the work surface, at the bottom of the 2x6, and 1' or more from the other
end. |
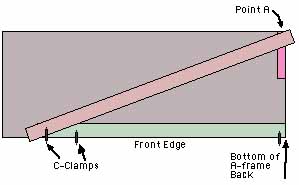
 Lay an uncut 2x6 diagonally across
the work surface such that the 2x6's edge (the edge furthest from the front) passes over point A of the bench (see drawing).The other edge of the 2x6 should
pass over the front top corner of the cut 2x6 (see drawing). C-clamp the new 2x6 over the
other 2x6. Place a length of 2x4 (or 2x6) under the new 2x6 at point
A to yield a straight-edge. Now use a pencil to mark the uncut 2x6 at the top of
the cut 2x6, and at the straight edge. Remove the uncut 2x6 and cut at the 2 marks. Lay an uncut 2x6 diagonally across
the work surface such that the 2x6's edge (the edge furthest from the front) passes over point A of the bench (see drawing).The other edge of the 2x6 should
pass over the front top corner of the cut 2x6 (see drawing). C-clamp the new 2x6 over the
other 2x6. Place a length of 2x4 (or 2x6) under the new 2x6 at point
A to yield a straight-edge. Now use a pencil to mark the uncut 2x6 at the top of
the cut 2x6, and at the straight edge. Remove the uncut 2x6 and cut at the 2 marks. |
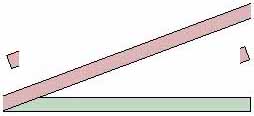
| Carefully place the 2x6 back where it was, lining up the two cuts with
the end of one 2x6 and with point A on the bench top. Secure the two 2x6s together by
clamping the newly cut 2x6 to the bench top. You are now ready to screw the two 2x6s
together. |
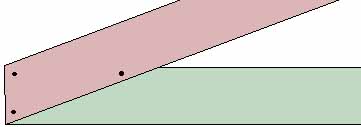 |
| Making sure the two 2x6s are securely clamped to the work-surface (look
for gaps between the two boards), pre-drill three holes and screw in three long sheetrock
screws. |
| Build a mirror image A-frame part. Do this by placing the first, cut 2x6
on the front edge of the work-surface but with one end towards the opposite side of the
bench than you did last time. Follow through with the rest of the procedure. |
|
|
