Building the bench side A-frame parts, part 2
|
Sign
Guestbook
View
Guestbook |
    |
|
| You now have two A-frames. They should be symmetrical. |
Adding the side flanges
|
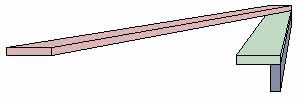 Get two uncut 2x4s. Cut them to
the same length as the vertical part of the A-frame (green board in our images). Use a few
C-clamps to hold a side flange 2x4 to each A-frame so that the flat side of the 2x4 lines
up with the very back of the A-frame:. Use a small drill bit to make starter holes and
long sheet-rock screws to attach each piece. Place a screw every 8 inches starting 2
inches from the bottom of the A-frame, up to about 2 includes from the top. Get two uncut 2x4s. Cut them to
the same length as the vertical part of the A-frame (green board in our images). Use a few
C-clamps to hold a side flange 2x4 to each A-frame so that the flat side of the 2x4 lines
up with the very back of the A-frame:. Use a small drill bit to make starter holes and
long sheet-rock screws to attach each piece. Place a screw every 8 inches starting 2
inches from the bottom of the A-frame, up to about 2 includes from the top. |
Adding work-surface leg supports
|
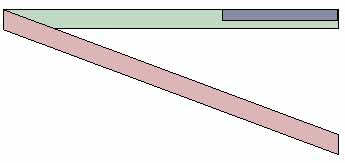 Get an uncut 2x4. Cut two 3'
pieces. Lay one on the bottom rear of an A-frame and clamp it. Drill four starter holes
about 3/4" in from each corner of the 2x4 and screw it down with long sheet-rock
screws. Do this on the other A-frame as well. Get an uncut 2x4. Cut two 3'
pieces. Lay one on the bottom rear of an A-frame and clamp it. Drill four starter holes
about 3/4" in from each corner of the 2x4 and screw it down with long sheet-rock
screws. Do this on the other A-frame as well. |
 |
Setting up alignment for shelf chocks
|
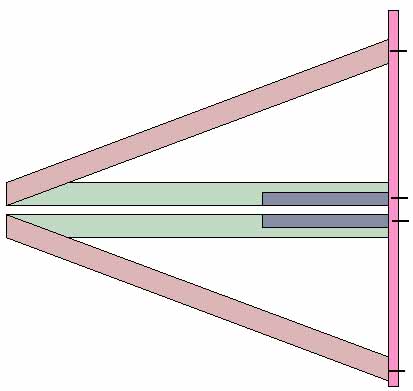 Grab an uncut 2x4. Lay the two
A-frames on the floor back to back with an inch or so of space between. Use a couple of
2x4 blocks to assure constant spacing. Lay the uncut 2x4 across the bottoms of the
A-frames. Clamp the front bottom of each A-frame to the 2x4. Make sure the bottoms of the
legs line up and that the backs are parallel. The bottoms must
line up. The backs should be parallel. If they are not
but aren't off by much you might toss it off to finagle and get on with it. With practice
you get pretty good at making A-frames so... maybe my first bench wasn't perfect either. Grab an uncut 2x4. Lay the two
A-frames on the floor back to back with an inch or so of space between. Use a couple of
2x4 blocks to assure constant spacing. Lay the uncut 2x4 across the bottoms of the
A-frames. Clamp the front bottom of each A-frame to the 2x4. Make sure the bottoms of the
legs line up and that the backs are parallel. The bottoms must
line up. The backs should be parallel. If they are not
but aren't off by much you might toss it off to finagle and get on with it. With practice
you get pretty good at making A-frames so... maybe my first bench wasn't perfect either. |
 |
| Now we can use the 2x4 to simulate the floor and we can measure from
there to the level of the various shelves and to the work surface. |
Adding work surface rails
|
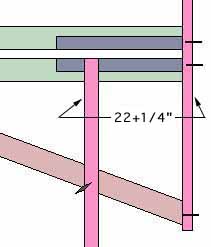 Take an un-cut piece of 2x4 and
place it so that one end is perpendicular to the back of an A-frame. This 2x4 will cross
the front of the same A-frame. Use your square to make it perfectly parallel and use your
measuring tape to place the far edge of the 2x4 22+1/4" from the bottom of the
A-frame. Take an un-cut piece of 2x4 and
place it so that one end is perpendicular to the back of an A-frame. This 2x4 will cross
the front of the same A-frame. Use your square to make it perfectly parallel and use your
measuring tape to place the far edge of the 2x4 22+1/4" from the bottom of the
A-frame. |
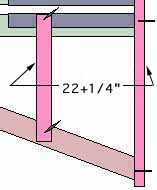 Make a mark on the A-frame where
the 2x4 is placed so you can place it there again conveniently. Make the mark on both the
front (leaning) 2x6, and on the 2x4 mounted to the back of the A-frame. Make a mark on the
newly placed 2x4 an inch back from the front edge of the A-frame. The 2x4 needn't extend
all the way to the front of the A-frame but it must be screwed down securely. Cut the 2x4.
it should be 28ish inches long. Make a mark on the A-frame where
the 2x4 is placed so you can place it there again conveniently. Make the mark on both the
front (leaning) 2x6, and on the 2x4 mounted to the back of the A-frame. Make a mark on the
newly placed 2x4 an inch back from the front edge of the A-frame. The 2x4 needn't extend
all the way to the front of the A-frame but it must be screwed down securely. Cut the 2x4.
it should be 28ish inches long. |
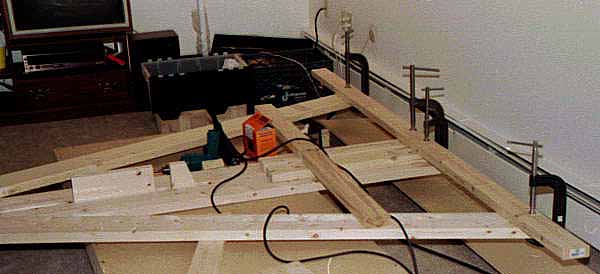
| Now, put the 2x4 back; secure it with C-clamps, drill four starter holes,
and screw with long sheet-rock screws. Now do the same on the other A-frame. |
 |
|
|